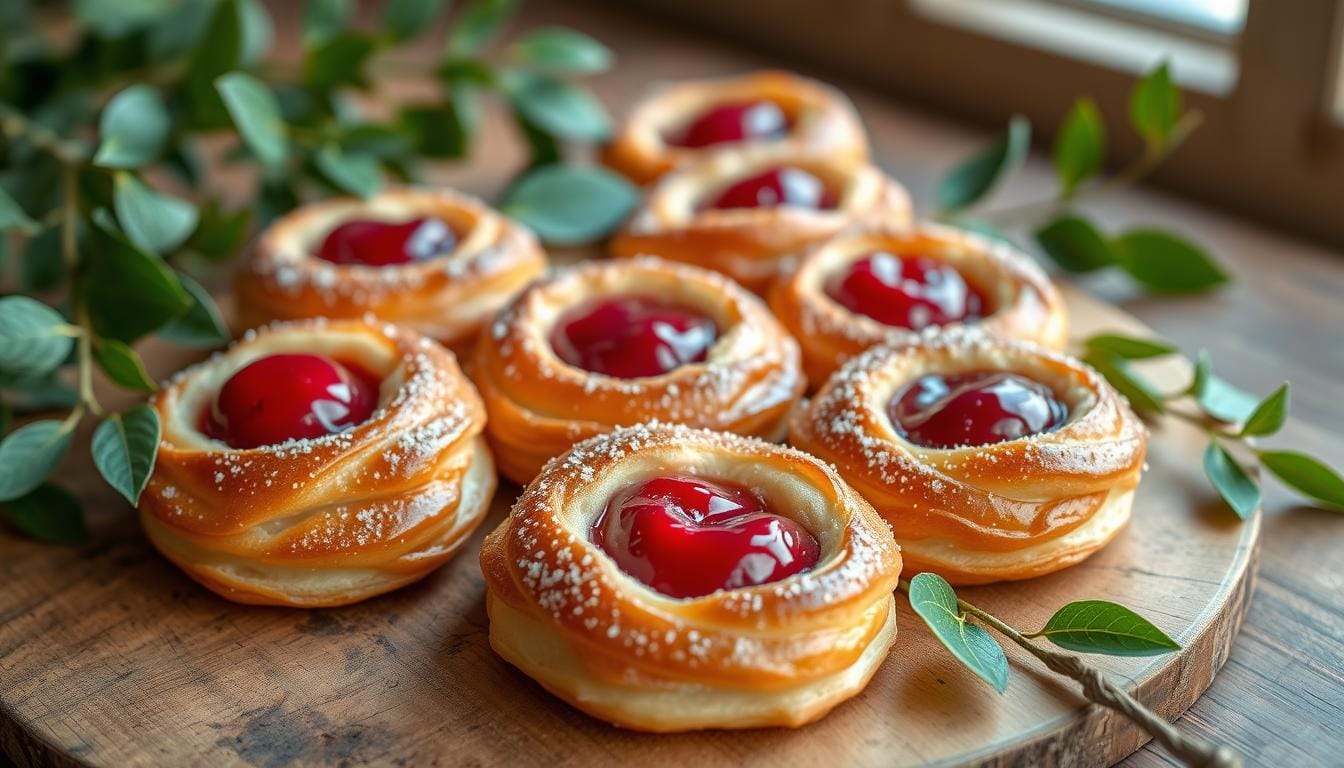
Imagine waking up to the sweet aroma of freshly baked cherry danish pastries. They’re made with a simple recipe that’s easy to follow. These treats combine layers of buttery, flaky puff pastry with a creamy filling and sweet cherries.
They’re perfect for an easy cherry pastry recipe. You can make them in just 15 minutes of prep and 15 minutes of cooking. This means you can have homemade danish pastries ready in no time.
Making cherry danish pastries is easy, whether you’re a seasoned baker or a beginner. You can customize the recipe to your liking. Use fresh cherries or cherry pie filling, and even make your own puff pastry from scratch.
With this easy cherry pastry recipe, you’ll create delicious cherry danish pastries. They’re perfect for any occasion.
Table of Contents
The History and Origins of Cherry Danish Pastries Recipe.
The history of Danish pastry goes back to the Middle Ages. It involves layering dough and fat to make a flaky texture. This method, called lamination, is still used today to make cherry danish pastries. The evolution of cherry danish pastries shows how adaptable this traditional dessert is.
The danish pastry heritage is rich and diverse. In Denmark, pastries are filled with jam, marzipan, custard, and nuts. The cherry danish pastries history is linked to Austrian baking techniques introduced in the 19th century.
Danish Pastry’s European Heritage
In Europe, Danish pastries are a favorite in many countries. Each region adds its own special touch. In the UK, they can have jam, custard, apricots, cherries, raisins, almonds, pecans, or caramelized toffee. Cardamom is often used for its aroma.

Evolution of Cherry Danish in America
In the US, Danishes are often topped with fruit or sweetened cream cheese before baking. Nuts are also a favorite topping. The evolution of cherry danish pastries in America shows how bakers adapt and innovate.
Traditional vs Modern Variations
Today, cherry danish pastries come in many shapes, sizes, and flavors. From classic recipes to modern twists, there’s a cherry danish for everyone. Whether you love the traditional danish pastry heritage or prefer something new, these pastries are irresistible.
Essential Ingredients for Perfect Cherry Danish Pastries Recipe
To make delicious cherry danish pastries, you need the right ingredients for cherry danish pastries. You’ll need high-quality butter, cream cheese, sugar, and vanilla extract. These ingredients are key to the pastries’ flavor and texture.
The cherry pastry filling is a must-have. You can use fresh or frozen cherries, sugar, and lemon juice. The filling should be sweet and tangy, with a smooth texture.
Other essential ingredients include puff pastry and egg yolks. Puff pastry makes the pastries flaky and buttery. Egg yolks enrich the dough, making it more flavorful and textured.

You can also add half-and-half, yeast, and confectioners’ sugar to enhance the pastries. These ingredients add richness, softness, and sweetness.
Using the right mix of ingredients for cherry danish pastries leads to delicious results. Whether you buy puff pastry or make your own dough, quality ingredients and careful preparation are key.
Required Kitchen Tools and Equipment
To make delicious Cherry Danish pastries, you’ll need the right tools and equipment. A lightly floured surface is key for rolling out puff pastry. It prevents sticking. Expert bakers say a rolling pin and baking sheets are essential for any serious baker.
Having professional baking tools can also improve your pastry quality. A pastry brush is great for egg wash. A mixer helps with the filling. Investing in these tools can help you achieve professional results.

Basic Equipment Needs
- Rolling pin
- Baking sheets
- Mixing bowls
- Measuring cups and spoons
Optional Tools for Professional Results
- Pastry brush
- Mixer
- Food processor
- Piping bag and tips
With the right tools and equipment, you’re on your way to making delicious Cherry Danish pastries. A bit of practice and patience will make you a master baker. Enjoy the fruits of your labor.
Classic Cherry Danish Pastries Recipe
To make a tasty classic cherry danish recipe, you’ll need frozen puff pastry, cream cheese, and cherry pie filling. Start by preparing the puff pastry. Roll and fold it several times to create layers for a flaky texture.
Making a homemade cherry pastry is a delightful way to enjoy a sweet treat. This recipe makes 18 cherry danishes in a few hours. The prep time is about 2 hours, with an extra day for refrigeration and rising.
Key ingredients include 600 grams of all-purpose flour, 525 grams of cold unsalted butter, and a can of cherry pie filling. You’ll also need 1 cup of confectioner’s sugar mixed with 3 tablespoons of milk for the glaze. For more baking tips and recipes, visit crazerecipe.com.
Here are some tips for making this recipe:
- Use a food scale for accurate ingredient measurements
- Roll and fold the dough multiple times during the lamination process
- Make a deep indentation in the center of each danish to hold the cherry filling
- Glaze the danishes after they have cooled for 5 minutes on a cooling rack
By following these tips and using quality ingredients, you can make a delicious classic cherry danish recipe. It’s perfect for impressing friends and family. Whether you’re an experienced baker or just starting, this recipe is a great way to enjoy a sweet treat and hone your baking skills.
Making the Perfect Cherry Filling
To make a tasty cherry Danish pastry, you need a great cherry filling. It should be sweet but also a bit tangy. The filling should be just right, not too runny or too thick. You can mix fresh or frozen cherries with sugar and cornstarch for this.
For a top-notch cherry filling, try using Lucky Leaf. It’s free of high fructose corn syrup. This makes it a healthier choice for your pastry.
Getting the sweetness and flavor right is key. You can use cherry pie filling made with fresh or frozen cherries. Adding a vanilla glaze on top adds extra flavor. Cooking the cherries with sugar and cornstarch helps get the perfect consistency.
Sweetening and Flavoring Tips
To sweeten and flavor your filling, try sugar, honey, or almond extract. It’s important to find the right balance. This way, your filling won’t overpower the pastry.
Achieving the Ideal Consistency
Getting the filling’s consistency just right is important. It should be thick enough to hold its shape but still pourable. Cooking the cherries with sugar and cornstarch or using Lucky Leaf can help. Follow these tips to make a delicious cherry filling for your Danish pastry.
Shaping and Forming Techniques
Shaping cherry danish can be tricky, but with the right techniques, you can make beautiful cherry pastry shapes. First, roll out the puff pastry to the right thickness. Then, cut it into rectangles. These will be the base of your cherry danish, so make sure they are even.
Next, press the rectangles into muffin pans to form a cup shape. This helps the pastry hold its shape during baking. You can also use a cookie cutter for fun shapes, adding creativity to your shaping cherry danish process.
To add a decorative edge, use a knife or pastry brush. This adds elegance and helps the pastry hold its shape. With these techniques, you’ll make beautiful and delicious cherry danish pastries. Visit red velvet cookies for more baking inspiration.
To get perfect cherry pastry shapes, keep your pastry dough cold. This helps it hold its shape during baking. With practice and patience, you’ll master forming pastry and shaping cherry danish in no time.
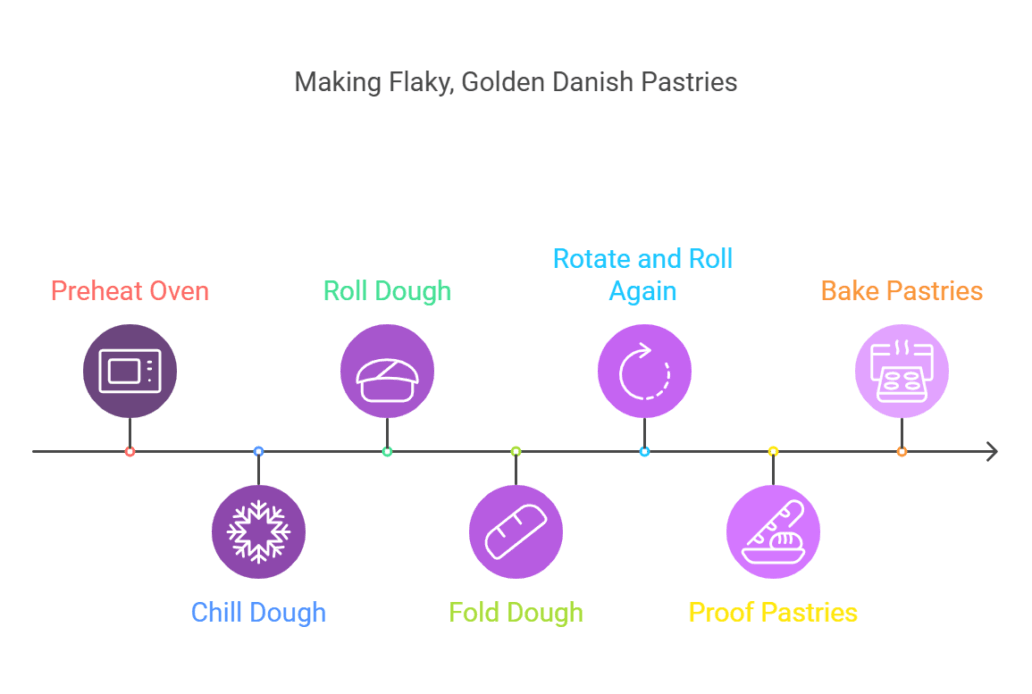
Professional Tips for Flaky, Golden Results
To get a flaky, golden pastry, follow some expert tips. First, preheat your oven to the right temperature. Experts say 400°F is best for Danish pastries.
But temperature isn’t the only thing that matters. Lamination techniques are key too. This means rolling and folding the dough to create layers. Roll it into a 10″ x 24″ rectangle, fold it in thirds, then rotate and roll it out again.
Temperature Control Secrets
Keeping the right temperature is crucial. Chill the dough in the fridge for at least 2 hours, or up to 16 hours. This lets the dough relax, making it easier to work with.
Lamination Techniques
Lamination is vital for flaky pastry. Roll and fold the dough to create layers of butter and dough. Repeat this a few times for extra flakiness. Keep the dough cold to prevent the butter from melting.
Timing and Proofing Guidelines
Timing is key when baking Danish pastries. Bake them for 15 to 18 minutes, until they’re golden. Also, proof the pastries before baking. This helps them rise and gives them a light texture. Follow these tips for flaky, golden Danish pastries that will wow everyone.
Storage and Make-Ahead Instructions
Storing cherry danish right is key to keeping them fresh. Experts say you can store them in an airtight container in the fridge for up to three days. This is great for making ahead and serving later.
Freezing is another option for longer storage. You can freeze individual pastries. They’ll stay flavorful for 1 to 3 months, depending on how well you wrap them. Freezing is ideal for making ahead pastry. Just thaw and reheat when you’re ready to serve.
Here are some tips for storing cherry danish:
- Store in an airtight container to keep fresh
- Freeze individual pastries for longer-term storage
- Reheat thawed pastries in the oven or microwave
By following these tips, you can enjoy your cherry danish for days. Whether it’s for a special event or just a treat, proper storage is crucial. With these instructions, your cherry danish will stay fresh and delicious, perfect for storing or making ahead..
FAQ
What are the key ingredients for making Cherry Danish Pastries?
To make Cherry Danish Pastries, you need high-quality butter, all-purpose flour, and cream cheese. Cherry pie filling and eggs are also key. These ingredients make the pastry flaky and the filling rich and fruity.
What kitchen tools and equipment are needed to make Cherry Danish Pastries?
You’ll need a rolling pin, baking sheets, and parchment paper. A pastry brush is also useful. You can use a stand mixer to help, but simple items work too.
How do you make the perfect cherry filling for the pastries?
Use fresh or frozen cherries for the filling. The goal is to mix sweetness with the right consistency. Cook the cherries with sugar and cornstarch to get a spreadable filling.
What are the best techniques for shaping and forming the Cherry Danish Pastries?
Start by rolling out the puff pastry into rectangles. Then, shape the pastries into triangles or spirals. This makes them look impressive and appealing.
How can you ensure the Cherry Danish Pastries turn out flaky and golden?
Control the temperature and use lamination techniques. Timing and proofing are also key. Following expert tips will help you make flaky, golden pastries every time.
How can you store and make ahead Cherry Danish Pastries?
You can freeze the pastries for later. To keep them fresh, store them in an airtight container. This way, you can enjoy them whenever you want.
Conclusion
Making homemade cherry danish pastries recipe is a rewarding experience. With the right ingredients and techniques, you can create your own unique cherry danish legacy. Don’t be afraid to try different fillings and toppings to find your favorite.
The joy of baking these treats is in the process, not just the end result. Enjoy the art of lamination, the kneading, and the first bite. Each homemade pastry shows your creativity and dedication.
So, preheat your oven and gather your ingredients. Start your journey to make perfect cherry danish pastries. Share them with friends and family. Inspire others to join you in this baking tradition. The memories you make will be sweeter than any glaze or filling